Can Draw a Circle in Pencil 2d
Pencil2D, an easy-to-use painting and 2D animation program, lets you create small animations quickly. Despite the simple user interface, you might demand a little help getting started.
If you desire a hand-drawn ball to drop elegantly from the ceiling in a YouTube video, Pencil2D [ane] is the programme for you. Thanks to this drawing program, artists can do more than just pigment pretty comic figures, balls, or other objects on virtual paper; they tin can likewise breathing these objects. If required, the tool imports bitmap images or photos for apply equally backgrounds.
Pencil2D is primarily intended for cartoon artists, but the software also lets you lot apace create blithe illustrations or diagrams. All y'all accept to do is add a little of your own artistic talent. An impressive YouTube video [2] shows what professional person animators have created with Pencil2D. The plan is licensed nether the GPLv2; the source code is available from GitHub [3].
Some distributions have Pencil2D in their repositories. Arch Linux users will find the tool in the pencil2d packet in the Arch Users Repository (AUR). On current Fedora systems, you can fetch and install the parcel by typing:
sudo dnf install Pencil2D
Debian and Ubuntu users install the pencil2d bundle at the command line with:
sudo apt install pencil2d
If the animation programme is missing from your distribution's software manager, or if you only find an older version stored there, yous tin use a Flatpak or AppImage package – most current distributions now back up both formats. Pencil2D's Flatpak packet is bachelor from the Flathub repository. To retrieve and install it from Flathub, use the first ii commands in List 1; the third command starts the animation program.
List 1
Installing the Pencil2D Flatpak
$ flatpak remote-add --if-non-exists flathub https://flathub.org/repo/flathub.flatpakrepo $ flatpak install flathub org.pencil2d.Pencil2D $ flatpak run org.pencil2d.Pencil2D
The AppImage is available directly on the Pencil2D website [1]. Click on Download, then select the Current Stable Version. Beneath the penguin icon, select the version that matches your distribution. Then brand the downloaded file executable (Listing 2) and launch information technology.
Listing ii
Installing the Pencil2D AppImage
chmod +x pencil2d-linux-amd64-<Version>.AppImage
Kickoff Drawing
When launched, Pencil2D opens the main window shown in Effigy 1. In the eye, y'all can see the empty cartoon surface area. In the top left corner, you'll detect the cartoon tools. The pencil draws sparse lines; the brush makes thicker lines.
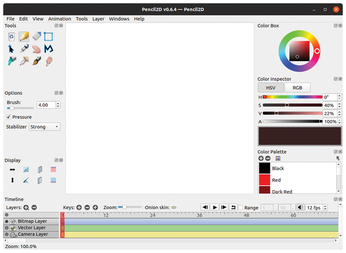 Figure 1: On the left beneath Options, you will find additional settings for the selected tool (e.g., a brush's stroke width).
If you need a straight line, select the Polyline tool, the button that resembles an "1000" (Figure two). The first mouse click defines the starting point; clicking again adds a section. Double-click to terminate the drawing process. The eraser does pretty much what yous would wait; the index finger smudges the area nether the mouse pointer when you printing the mouse push button. The garbage can clears the complete drawing area without prompting.
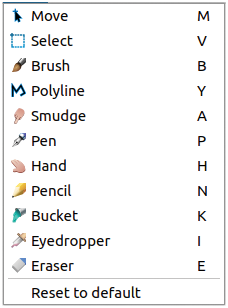 Figure two: Y'all do not need to navigate the menus to enable the painting and editing tools – all y'all take to do is press a shortcut key.
When painting, a grid tin can exist placed over the cartoon surface area using View | Raster. You determine the size of the private boxes under Edit | Preferences | General | Filigree section. To zoom in or out of the drawing, use the mouse wheel, or hold downwardly Ctrl while pressing the up or down arrow key.
In the Colour Box window, you can define the drawing color (Figure 3). Beginning select the base colour from the cycle and then choose the brightness from the inner square. Alternatively, click RGB and use the sliders to mix the three basic colors (cherry, green, and blue). To avoid having to ascertain a colour time and time again, you can add the colour past pressing the plus symbol next to the Colour Palette. Pencil2D automatically gives the color a name, which you tin can change past double-clicking on it. You can then select a color from the palette with a unmarried click.
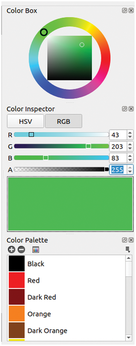 Figure 3: The A slider defines transparency. Translucent objects are peculiarly important when using layers.
Moving Images
Using the timeline at the lesser, you can exhale life into your cartoon. Pencil2D relies on the flip-book principle. An animation consists of a sequence of private images that the tool somewhat inconsistently too refers to as keys. The following case of a ball dropping demonstrates how apace an animation can exist created in Pencil2D in this way.
First draw a circle at the elevation of the drawing expanse. We now want the brawl to slowly drop. To do this, create a new frame past selecting Blitheness | Add Frame or by pressing the F7 fundamental. You will now see a new empty drawing surface area, while the vertical red mark moves one position to the right in the timeline.
Using the . and , keys allows yous to leap back and along between the existing images. In the top line of the timeline, Pencil2D numbers the images consecutively. If y'all click on a number there, you are taken directly to the matching single screen. The Zoom slider lets you expand the timeline's width on screen and thus simplify navigation. In any example, the cerise bar marks the paradigm you are currently viewing and editing in the drawing area. Brand certain Pencil2D displays the second frame you just created and the new empty drawing area.
Onion Skin
To drop the ball, draw another circle slightly below the first one. This is not so easy since you can't run into the ball from the commencement picture. To change this, yous tin press O, become to View | Onion skin | Previous, or click on the second push button from the right in the top line under Brandish (see Effigy 4).
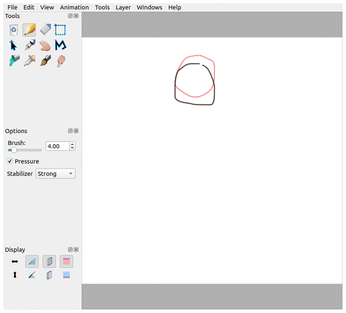 Figure 4: Y'all can see two frames, which Pencil2D will play dorsum i afterward the other. The blackness circumvolve resides in the second frame; the circle in the starting time frame is brilliant red.
Now, the first image appears, colored light grey, in the drawing area. Pencil2D refers to this image as the onion pare. To brand it more obvious that this is the brawl from the previous image, you can color it red by clicking on the icon with the red box nether Display. Now describe a new ball slightly below, which is colored black, as shown in Effigy 4.
Repeat this procedure until the ball arrives at the bottom of the drawing area. To brand your work easier, click on the Select tool (with the dashed rectangle) and draw a frame around the ball. You can grab the option using the handles at the corners.
Select Edit | Copy to create a new frame. The pick rectangle should appear automatically. Movement the mouse pointer into the rectangle until it turns into a circumvolve. Now move the box a little to the right using drag and drib. And then use Edit | Paste to insert the copied circle at exactly the position shown in Figure five. Yous can unselect by clicking anywhere on the drawing area.
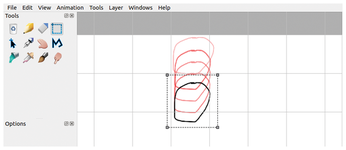 Figure v: The Select tool helps yous re-create and motility objects beyond multiple frames.
When fine-tuning more than circuitous animations, yous will often need a preview of the following epitome. To practice this, simply click on the second symbol from the right in the bottom line on the left side under Display. The following images are now displayed every bit grey shadows. To assistance distinguish them, you can color them light bluish, every bit shown in Figure half-dozen, by clicking on the blue foursquare icon under Display.
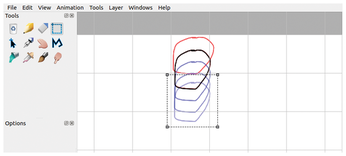 Figure 6: This figure shows a single frame selected from the eye of the animation. The previous circle is bright cherry, the current circle is black, and the three following circles are light bluish. This makes it piece of cake to follow the animation process.
Source: http://www.linux-magazine.com/Issues/2019/229/Moving-Art
Postar um comentário for "Can Draw a Circle in Pencil 2d"